

In the designs I create, my goal is to always bring to life a feeling that reflects the client's personal style. To help me convey this feeling to clients, I make mood boards. I have found it to be the easiest way to visually show my clients how everything in the design is going to talk to one another. Here is a step-by-step of my design process using this method. Enjoy the little peek into how my mind works!
Step 1: The Client
Prior to starting a project or making a mood board, I have to understand the vibe of the family and how they are wanting to use the space. Today I want to focus on a recent install I did for a client's home office for a new home they were moving into and would be using frequently. One of the stipulations from them was to try and infuse some of their current furniture from the old house, accessories from travels, and pictures of family. Let's take a look at what I was working with from the old house.


Step 2: Floor Plan
Now that I know what I am working with and understand how my client was going to work with in the space, I started experimenting with floor plans. As a designer I have to be conscious of both form and function.
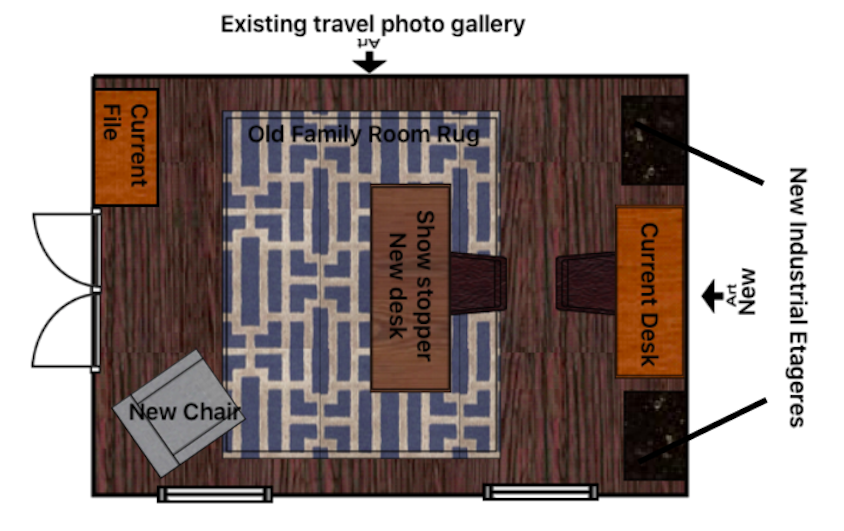
The final layout utilized the depth of the office in order to use one of their desks against the wall with both of their desk chairs back to back and a new desk floating in the middle of the space. This symmetrical design also creates a balanced design allowing for the room to remain structured.
Step 3: The Mood Board
After finalizing the layout of their home office, I started to bring elements together on my mood board to show them how things would flow nicely with current items found in their old home all while infusing some much needed items for the refresh!

The pivotal piece of furniture in this design was the new desk. The modern walnut wood sides connected with the color of wood from their older traditional office furniture while bringing in a more modern industrial flavor to the design. Other elements that were newly brought into the office to connect with the more traditional prior office furniture would be a transitional channel back wing chair and touches of global inspired accessories. So that the desk wouldn't be the only industrial piece in the room, I wanted to bring a pair of metal etageres and a statement chandelier.
I would re-using the living room rug from their old house since it no longer fit in that room. This helped dictate the color scheme of the design. The connect with the navy blue, I proposed pops of teal hues, keeping the design really fresh and updated. The modern art in shades of blue would be hung above the old desk and between the pair of etageres, this would draw your eye into the room right as you walked through the door.
Step 4: The Final Product
The best part about design is when it all come together and the client couldn't be happier. This design shaped up even better than I could have imagined. I feel so fortunate that my client's trusted the vision I had for their new home office. It is the perfect blend of modern and traditional, new and old, and designer touched mixed with their personal style. Project success!
